
How To Fix An Old Wine Barrel Planter

Wondering how to fix an old wine barrel planter? You know, the ones with the rings that fall to the ground at some point in the barrels life? It’s pretty easy actually!
If you have one of those wonderful old, half wine barrel planters in your yard, chances are you know that at some point, the wood can dry out and the rings will fall to the ground.

That’s what happened to an old planter my mom had. We actually planned to leave it behind during the move, but the movers brought it along anyway, so I figured I’d better fix it instead of letting it rot away.
My mom had purchased a Meyer lemon tree, and we both thought the barrel was the perfect home for it. So we got busy and the above photo is the end result. Beautiful!
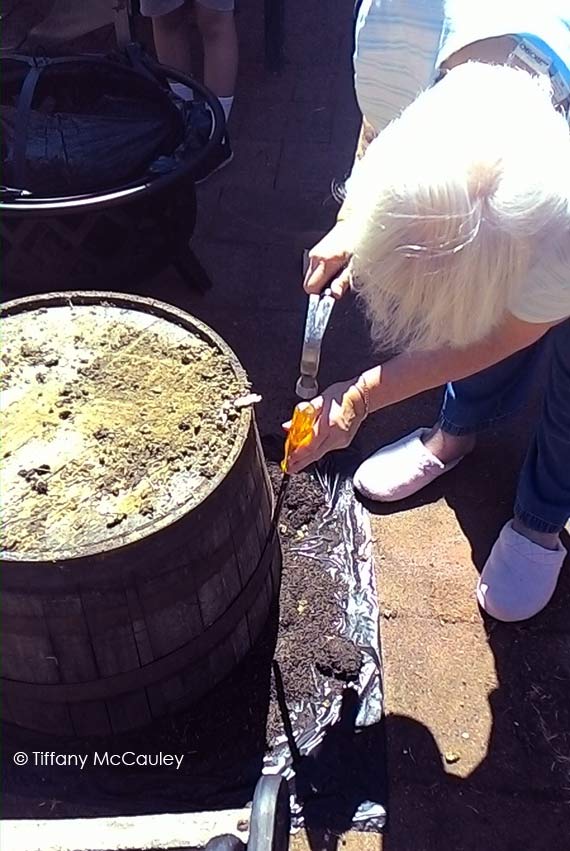
Sorry for the over exposure in the following shots. It was 100 degrees F. outside, the sun was directly over us and I shot these with my smartphone. I guess it’s not smart enough to avoid overexposure. Won’t make that mistake again!
HOW TO FIX AN OLD WINE BARREL PLANTER
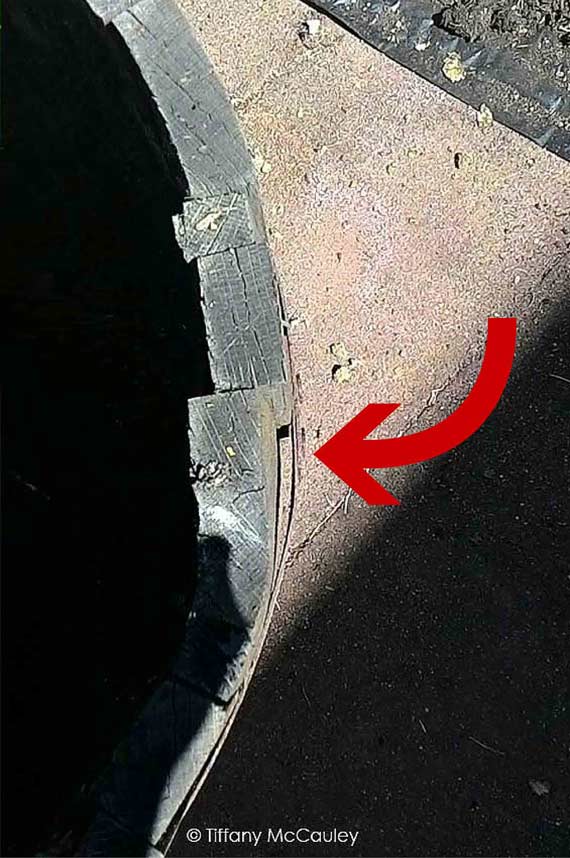
This is what the rings look like. The barrel is missing it’s middle ring all together, so all I had to deal with were the top and bottom rings. To make matters even simpler, the bottom ring was still fully attached. So that left me with just the top ring to get back into place.

I emptied out the dry dirt that was in there. It was pretty easy to remove just by tipping the barrel over carefully so as not to damage the dried out wood. Then a little bit of tapping on the ring with a hammer and large, flathead screwdriver got the ring back into place. And yes, that’s my mom doing the work! She loves these kinds of projects and just sort of took over which gave me the opportunity to take photos!
Note that if you try this a few times and the rings just won’t stay put, you can use this step to also gently hammer in a few nails to help the rings stay in place. Just be gentle. Even a few thumbtacks might work here.
We then carefully tipped it back onto it’s bottom.

Then, if you look closely, some of the boards got a little squished with the ring being pushed up that far. So we gently tapped them back into place, making sure that the ring didn’t fall down again (which it actually did, and we had to do the process all over again. Then we got the whole thing as wet as we could. (Wet part not shown here. I got a little trigger happy with the camera. Sorry! But I promise, we got it good and wet).
Then we added layers of soil and fertilizer, adding water as we went to ensure that the soil was soaked as well. When you do this, be sure to go a little overboard on the watering because the wood will soak up a lot of the water.
Then we planted our lemon tree and ended up with this beauty!

I know it looks like the bottom ring is loose, but it’s not. It’s just the dark area on the wood that is giving it that illusion. Didn’t it turn out nice though? What a great home for a lemon tree!


Sorry, l thought the idea of showing a repair job is to get the worst scenario to fix not your own simplest one, so if all tree rings are damaged can you replace them with new ones, or bit of the wood has rotten.
Also l thought you NOT meant to get water actually touching the wood, ie to line the pot with a liner, am l not right?
Dr. NB – This is how I repaired what was wrong with mine. If rings are damaged, you’ll obviously need new rings. Same with the wood pieces. You would simply get some replacement pieces. Water is going to get on them any time it rains. You line the barrel so that the water doesn’t escape so easily, leaving your plants to dry out too fast. Hope that helps.
Thank you for sharing this! Turned out beautifully 😍
Erin – Yay! Fantastic! So happy it helped! 😀
Thanks for this! I will be solving this same problem shortly!
Tamara – My pleasure! I hope it helps!
Thank you so much Tiffany. You’ve given me the confidence to tackle 4 very dried out half-barrels. Much appreciated.
KJ – Fantastic! Let me know how it turns out!
I’m responding to this older post with my question because KJ’s barrel situation sounds the most similar to mine. My barrels are dried out and in desperate need of repair. This is the best guide I have found but I have just one question before I tackle this project: Should the barrel staves be wet prior to fixing? Or is it best to do the above method while in a dry state, then wet the barrel after reassembly?? Thank you in advance for any help!
Michelle – In my personal experience, it’s best to do this while they are dry. Otherwise, when they shrink, they pull away again. Hope that helps!
Thanks for this post! Someone gifted me 8 half wine barrels they didn’t want anymore, and I need to secure the rings before I move them around too much to their future locations.
Juniper – My pleasure!